During I Love to Read Month, my class made hand sewn books with Mrs. Dent to publish their stories. Here are step-by-step instructions on how they made the books.
Here are the supplies you will need:
- cardboard - You can use any size cardboard boxes and cut your pages to fit but if you are using 81/2"x14" paper folded in half, you will want cardboard pieces that are 91/2"x8" (22x20cm)
- butcher wrap paper or fabric - In this example we used paper and it was much easier to manage with younger students. Paper is also easier when creating cover designs. Fabric, on the other hand will look more authentic.
- glue (if you are using paper for the cover) or fusible web and an iron if you are using fabric. It was easier to apply the glue with a paint brush - gather baby food jars to hold small amounts of glue and plastic trays to keep the workspace tidier.
- scissors
- ruler, pencil
- paper clips (4)
- darning needle
- white cotton thread
 |
| The book in this sample was covered with fabric. |
Cut the Butcher Wrap paper to size - leaving about 3" on each side.
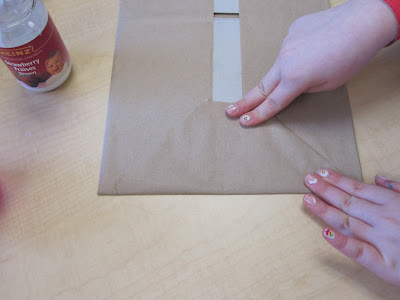
Leave a slight gap between the pieces of cardboard (front and back cover) and fold in the top, bottom, and sides.
Glue down each side with white glue. If you are using fabric for a cover you can use a fusible fabric to attach the fabric to the cardboard with an iron. You can also use an old paint brush and a jar to hold the glue - this method allowed us to smooth out the glue resulting in less "wrinkles".
Decide how many "pages" your story will have - remember to include a page for the Title Page, back of the Title Page, and About the Author (and a back for About the Author is also nice). Each piece of paper is actually 4 pages in the book so the above-mentioned will be one piece of 8 1/2 x 14 paper.
Select a coloured piece of paper for the outside of the paper bundle - it will later be glued to the cover you just made.
Now you are ready to sew!
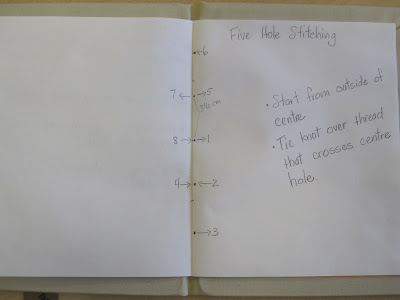
Paper clip the pages together as illustrated. Use a guide to draw 5 dots on the centre fold where you will sew the book together. Poke holes with your darning needle so when you are sewing it will be easy to go through.
In the above illustration you can see numbers and arrows - they indicate the order and the direction you are sewing.There are 5 holes. The centre hole is #1 and #8. The next hole down is #2 and #4. The bottom hole is #3. The second from the top is #5 and #7. The top hole is #6. You will start from the outside and end on the outside.
Start at the centre hole (#1) and go in from the outside. Make sure the thread goes all the way through and your knot is snug against the outside fold.
Next go out through hole #2, making sure the thread is taut and even. Come back in to the centre fold through hole #3 and go out through hole #4. Cross over the centre hole and go in to the centre fold through hole #5. Go out through hole #6 and come back in through hole #7. Fimally go out through hole #8.
Follow the number pattern and arrow directions from the illustration - each time making sure the thread is taut and smooth.
When you are finished sewing you will be on the outside and you will see the thread going over the centre hole.
Cut the needle off your thread and put one thread on each side of the centre thread - making a "V" with the thread you just cut - it is under the thread going over the centre hole. You created a "river in the valley".
Tie several knots - the centre thread will hold the knots in place.
 Glue the pages you just sewed to the cover; one side at a time. You may need to open and close the cover a few times to make sure the pages and cover are even.
Give your new book a gentle pat to make sure extra glue does not seep out and get ready to create your cover, share, and enjoy.


